
Now this was a project ! Actually a learning experience.
My brother in law agreed to help me with this, so we started about 10:00 this morning.
Not having a clue how we were going to get this done, we attacked from several angles.
First thinking that maybe the work could be done from the top we took out the air box, ECM, and tried to get the fusebox out. But we quickly decided that wasn't the way to go. There is just NO room at all to get in behind the headlight assemblies (especially on the drivers side). People are definately going to be paying the dealer a bunch of cash just to get headlights replaced when they burn out.
So, the next plan was to remove the headlight assemblies completely, thinking maybe that was not too difficult .
WRONG .... it was a pain to the point that we eventually ended up removing the entire front bumper of the car to be able to get the headlight assy out.
Once we had the car apart it was actually a very easy and super clean install because we were able to put everything inside the headlights. Nobody would ever guess that this was not a factory option.
Total job took us about 4 hours, mostly due to a couple of beer breaks and some extended head scratching along the way. But now that I know the tricks I'll bet I could have this done in a little over an hour.
I did take a bunch of pictures along the way so I'll get them sorted out and post a DIY in the next day or so.
HIDs are now installed
-
ThunderSky
- Posts: 46
- Joined: Sat May 29, 2010 3:02 am
- Location: Montreal, Quebec
2011 Kizashi SX - AWD
2008 Honda Civic
2007 Saturn Sky Redline
2001 Mazda Protege
2008 Honda Civic
2007 Saturn Sky Redline
2001 Mazda Protege
-
ThunderSky
- Posts: 46
- Joined: Sat May 29, 2010 3:02 am
- Location: Montreal, Quebec
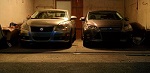
I'll have to get some more shots of the procedure, but here is the result.
I'll get a couple of nightime shots and post them too.
2011 Kizashi SX - AWD
2008 Honda Civic
2007 Saturn Sky Redline
2001 Mazda Protege
2008 Honda Civic
2007 Saturn Sky Redline
2001 Mazda Protege
Wow, that looks fantastic! Please do post all the pictures you took while doing this, the result is very tempting. Also, some information about the parts you used (and where you got them from) would be appreciated, as well. TIA.
-
TheHolyGhost
- Posts: 797
- Joined: Tue Jun 01, 2010 7:59 pm
- Location: Philadelphia
Looks great, can't wait to see more pictures! Links to where you bought the HIDs would be great as well.
2010 Kizashi GTS
6 speed
Platinum Silver Metallic (Battle wounded)
2014 Ford Focus Titanium Hatchback
Past Cars:
2008 Subaru Legacy 2.5i
1998 Audi A4 1.8TQM
1998 Dodge Avenger ES
6 speed
Platinum Silver Metallic (Battle wounded)
2014 Ford Focus Titanium Hatchback
Past Cars:
2008 Subaru Legacy 2.5i
1998 Audi A4 1.8TQM
1998 Dodge Avenger ES
-
uforaverwill

- Posts: 132
- Joined: Wed Apr 21, 2010 6:08 pm
I want that 
2010 Kizashi SE
Platinum Silver
Platinum Silver

well done.
-
ThunderSky
- Posts: 46
- Joined: Sat May 29, 2010 3:02 am
- Location: Montreal, Quebec
OK, here is the procedure as I documented it. I actually took many many more photos but then determined that some of the procedures weren't needed so I'll just post the relevant points. I missed a few pictures in some sections but I'll describe them as best I can.
Start with removing all the screws holding the bumper on underneatht the front of the car, including the small plactic wind deflectors (I didn't bother to take pictures there, it's pretty easy to figure out this part).
Now with the hood open, remove the plastic covers behind the headlight by popping the pushpins up and taking them out. Then just flex the cover a bit to remove it. This will give you access to the screws and pushpins that hold the headlight in at the top. (you'll remove them later)
Now, find the slot in the front edge of the Liner of the wheelwell and remove the screw that goes up into the fender.
Just turn the wheels a bit to allow extra access room if needed.
With this screw out you only need to add a good tug outwards to release that edge of the bumper.
Next remove the 3 screws holding the front of the bumper on the top, and the rubber bumpers (these just pull off)
Pull up on the top of the fender and slide it back, it should drop down enought to complete the rest of the job.
IMPORTANT, put something under the bumper to protect it. I released the wire harnesses for the Fogs, allowing the bumper the drop right to the ground where I had a couple of pads waiting.
Now you should have access the all the screws holding the Headlight assy to the car (don't forget to unplug the headlight at the rear)
This is where I missed a few good picture opps, but basically we flipped the headlight over an found a good, slightly recessed flat spot on the bottom, directly under the low beam. So we took a ballast and used it to mark the location for the screws (make sure the wires are towards the rear opening). We drilled the 3 holes, I think using a 1/8 drill bit (just slightly larger than the screws) We then placed the ballast inside the headlight assy and played around until it lined up to get a screw started from the outside. Finished putting in the screws, stuffed the rest of the wires inside after making the connection to the original plug (wrapped that well with black electrical tape), and that was it.
We now had HID headlight assemblies that still looked completely stock.
Now just reverse the process for re-installing the bumper and you are all set.
Start with removing all the screws holding the bumper on underneatht the front of the car, including the small plactic wind deflectors (I didn't bother to take pictures there, it's pretty easy to figure out this part).
Now with the hood open, remove the plastic covers behind the headlight by popping the pushpins up and taking them out. Then just flex the cover a bit to remove it. This will give you access to the screws and pushpins that hold the headlight in at the top. (you'll remove them later)
Just turn the wheels a bit to allow extra access room if needed.
IMPORTANT, put something under the bumper to protect it. I released the wire harnesses for the Fogs, allowing the bumper the drop right to the ground where I had a couple of pads waiting.
Now just reverse the process for re-installing the bumper and you are all set.
2011 Kizashi SX - AWD
2008 Honda Civic
2007 Saturn Sky Redline
2001 Mazda Protege
2008 Honda Civic
2007 Saturn Sky Redline
2001 Mazda Protege
-
TheHolyGhost
- Posts: 797
- Joined: Tue Jun 01, 2010 7:59 pm
- Location: Philadelphia
Good stuff, which HID kit did you use? Thanks for the write up, I think this is probably something we're going to see a bunch of people doing.
2010 Kizashi GTS
6 speed
Platinum Silver Metallic (Battle wounded)
2014 Ford Focus Titanium Hatchback
Past Cars:
2008 Subaru Legacy 2.5i
1998 Audi A4 1.8TQM
1998 Dodge Avenger ES
6 speed
Platinum Silver Metallic (Battle wounded)
2014 Ford Focus Titanium Hatchback
Past Cars:
2008 Subaru Legacy 2.5i
1998 Audi A4 1.8TQM
1998 Dodge Avenger ES

Im going to try this myself after i failed last week. I also noticed there is no room but with the help of your pictures and explainations i think i can get it done. Did you drill a hole in the plastic headlight cover so the cables for the HID's fit through?
MODS: catback exhaust, RRM SRI, 6000k HID, white led's all round, 22% tint, Rear swaybar, LED drl's, chrome stealth turn signal, scanguage II.
Sound system: 2 x Alpine 6.5" speakers, 2ch Pioneer amp and Fusion 10" subwoofer tube
Sound system: 2 x Alpine 6.5" speakers, 2ch Pioneer amp and Fusion 10" subwoofer tube
-
ThunderSky
- Posts: 46
- Joined: Sat May 29, 2010 3:02 am
- Location: Montreal, Quebec
No holes for wires needed. I stuffed the ballasts and all the wires right inside the headlight assy. Nothing outside at all. I drilled holes in the bottom of the headlight casing that matched the screw holes on the ballasts so I could secure the ballast from outside with screws to keep it from moving around in there, but I guess you could skip that if you are not comfortable with drilling holes in your headlights.will2k wrote:Did you drill a hole in the plastic headlight cover so the cables for the HID's fit through?
Good luck with the project.
2011 Kizashi SX - AWD
2008 Honda Civic
2007 Saturn Sky Redline
2001 Mazda Protege
2008 Honda Civic
2007 Saturn Sky Redline
2001 Mazda Protege