
DIY CVT Filter Change and Flush
-
ProMarinero

- Posts: 37
- Joined: Tue Jul 10, 2012 2:35 pm
I did a search for a sticky but didn't see one. Is there any interest in write-up? I just performed this service with no issues. Ugly stuff in there after 100k miles.
-
Triggerhappy
- Posts: 130
- Joined: Sun Nov 14, 2010 4:39 pm
Yes, please do a write up. Thanks.

152k miles - niece drives it now
2017 Prius Prime - about 65 mpg factoring in electricity cost
2018 Pacifica Hybrid - wife's
-
ProMarinero
- Posts: 37
- Joined: Tue Jul 10, 2012 2:35 pm
Unfortunately I didn't get many pics of the process. You'll have to do some interpolation here.
I used this writeup to get the major concepts: http://www.nissanclub.com/forums/f-q-20 ... hange.html . I've done a similar type of fluid change in the past on a standard auto trans. This one just slows it down to make sure the proper fluid quantity makes it back in.
Another good reference is here: http://aamcoftp.com/sites/aamcotech/ass ... manual.pdf
I don't know what all is out there for fluids that is spec'd for Suzuki transmissions. I use Red Line Oil in all of my transmissions and differentials as soon as warranties run out. I have found that their fluids actually DO make a performance difference. This started years ago when I first began using their 2-Stroke Race Oil and has since expanded to a lot of their product line. Red Line offers a non-slip CVT fluid that is rated for this transmission. The cheapest I found it was for a case of 12 qts. on eBay for $157 with free shipping. You'll need 10 for the whole thing here. The extra two I'm going to use in 50,000 miles when I drain the pan and refill with two more quarts.
Here we go...
The CVT uses two filters. There is one in the transmission pan itself and one on the side on the cooler return line. Both are available through O'Reilly auto. I'm guessing you can cross-reference the filter numbers to other places if necessary as the Jatco JF011E is used in several other makes of cars. The rubber gasket included with the pan screen sucks to try to get on. Be prepared to use a heat gun to flatten it or order the standard paper/metal unit from an OEM source. I did this whole thing on a full car hoist so if you're attempting it on jack stands then a flat gasket will be a big bonus. I would also order a new cooler filter unit O-ring. The new filter doesn't include it. I was able to re-use the old one but it was a pain. A new one would speed up the process.
I'm not going to give any disclaimers here. If this looks like too much, don't do it. If you're not familiar with this sort of thing, don't do it. However, I will say this in caps: AVOID ANY CONTAMINATION OF INTERNAL PARTS WHILE DOING THIS. Water, chemical cleaners and towel lint don't mix well with CVT's. Be sure you get the dirt out of any funnels used, don't use dirty cotton towels and ensure the only fluid on internal parts is CVT fluid.
1) Warm your trans up a little by driving around for 10 minutes.
2) Get the car in the air and remove the driver's side front skid panel. You will see a pan similar to this one (this is a Nissan pic):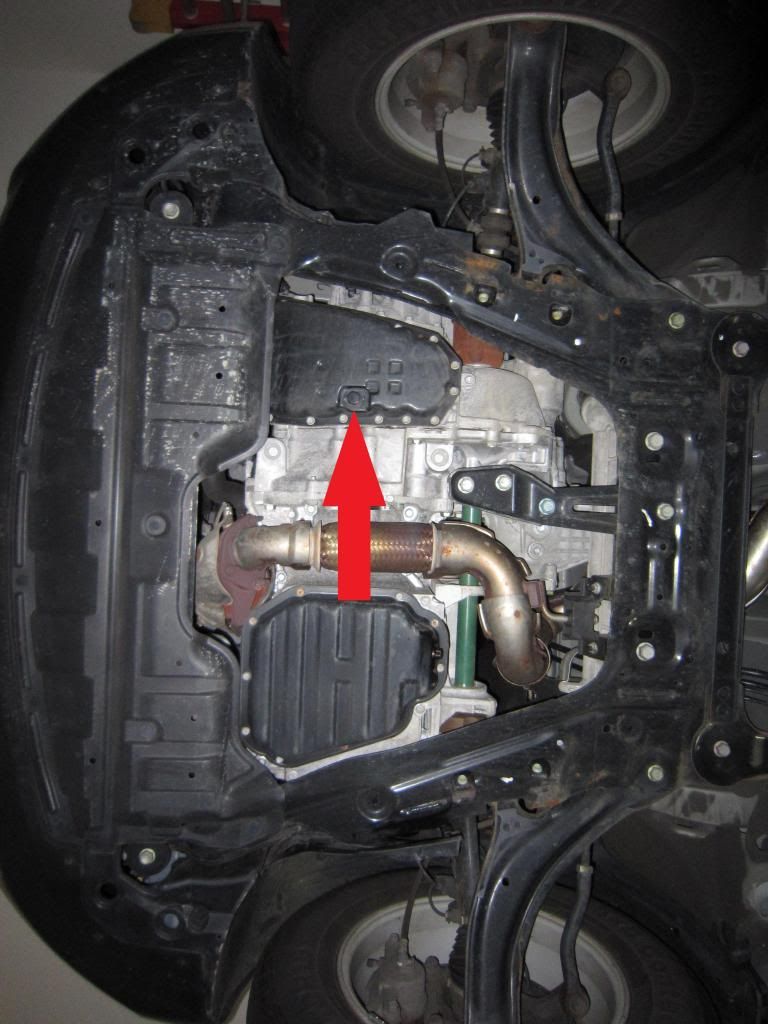
3) Remove the drain plug and drain out the old fluid. Be sure the plug crush washer comes with it. Up to you to replace it - I didn't.
4) Once fluid has drained, remove all pan bolts. Drop the pan slowly as there will still be some fluid in it. Drain it towards the rear.
5) Remove the gasket and all old material on the CVT gasket surface without gouging it up.
6) Clean off the magnets in the bottom of the pan. Don't drop them as rare earth magnets break easily.
7) Remove the old CVT filter screen. It's right on the bottom, held in by three bolts and looks exactly like the brand-new one in the box next to you - hence no picture. Make sure the old filter O-ring comes with it.
8) Install new filter screen with new O-ring included with it. You might need to loosely set the filter with o-ring in place and install the bolts for the final pop home. This is what I had to do. Torque is 70 in/lbs if you're into that. I use 2 or 3 fingers depending on what it felt like coming off.
10) Install pan with new gasket. Alternate bolt tightening around the pan for even pressure. Final torque is 70 in/lbs.
11) Re-fill trans through dipstick hole with a CLEAN funnel. Use about 4 and a third quarts. This completes the filter screen portion
12) Remove airbox. This will involve taking out the air filter, unbolting the three visible bolts and slipping the box out of the external air intake boot. You will also need to unplug the MAF sensor on the filtered air intake line and bungee the top of the housing away.
13) This is the only picture I took. It's a view below the airbox. The red arrow shows the filter cooler housing.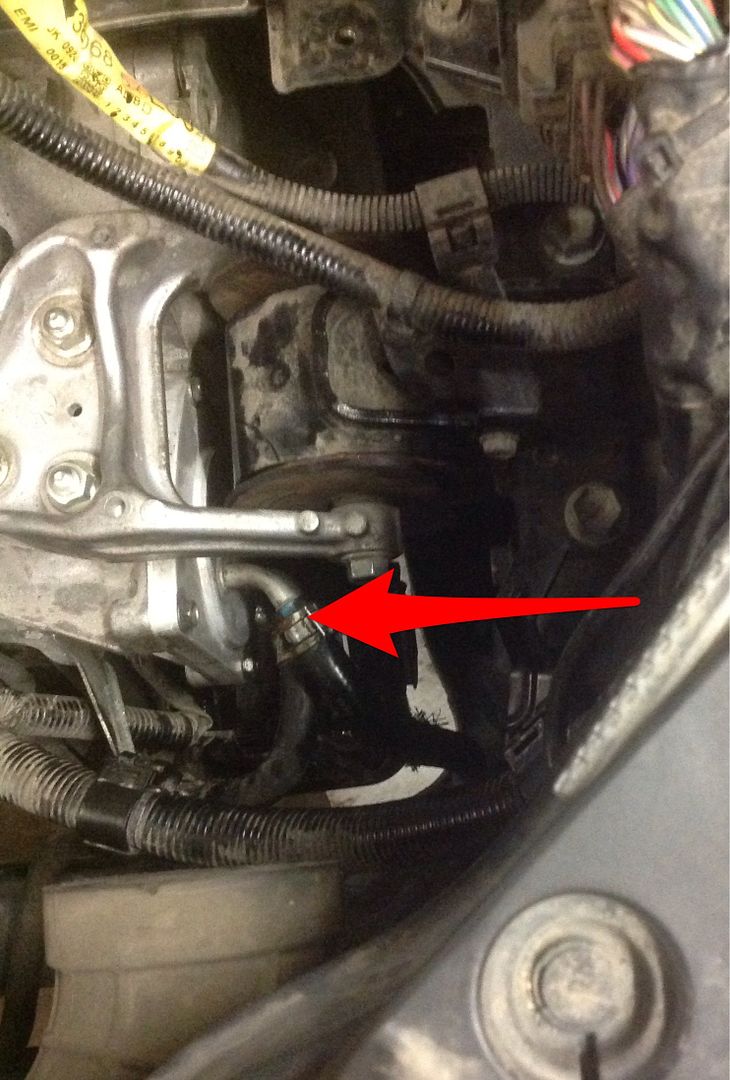 Remove the 4 bolts holding it on. Remove the filter inside and replace with a new one with new o-ring (should be included). If you have a new cover O-ring, put it on before installing the cover. Install the 4 bolts to 37 in/lbs. This completes the cooler filter install.
14) Remove the top line from the cooler filter housing. DON'T just jerk it. It's an aluminum elbow and might break. Break the hose bond free by twisting with pliers and then use a screwdriver to gently pry it off.
15) You've now removed the return line from the cooler This is the line you will use to pump out the old fluid. Install a double-ended barb fitting to the return line and run another line to a receptacle marked with fluid capacity. I used an empty gallon windshield washer fluid bottle that I marked with quarts.
15) Have somebody sit in the car and start it. It will take a moment before fluid starts pumping. Let it fill until just under the quart mark and then have them kill the engine. It will continue draining after the engine stops and should come up to the quart mark. Once finished, put a new quart in the CVT through the dipstick hole. Lather, rinse, repeat until you see clean fluid coming out. Should take 6 of your remaining quarts. Save the partial one from earlier for later adding if required.
16) Install the return line back on the filter. Have your assistant start the car and check for leaks. Have them cycle through the gears as well and hold for about 5 seconds in each one. NOTE- you might have a check engine light. This is due to the engine running with the MAF sensor unplugged. It will clear up once the MAF is plugged back in with 3-5 engine restarts.
17) Install the airbox.
18) Check your fluid level. Let the trans warm up a bit and it should go to between the Hot marks. Remember to check with the engine running. Drive it around a bit to let it warm up if necessary.
17) Crack a cold one and enjoy the dollars saved!
That's the skinny. Let me know if you have any questions.
I used this writeup to get the major concepts: http://www.nissanclub.com/forums/f-q-20 ... hange.html . I've done a similar type of fluid change in the past on a standard auto trans. This one just slows it down to make sure the proper fluid quantity makes it back in.
Another good reference is here: http://aamcoftp.com/sites/aamcotech/ass ... manual.pdf
I don't know what all is out there for fluids that is spec'd for Suzuki transmissions. I use Red Line Oil in all of my transmissions and differentials as soon as warranties run out. I have found that their fluids actually DO make a performance difference. This started years ago when I first began using their 2-Stroke Race Oil and has since expanded to a lot of their product line. Red Line offers a non-slip CVT fluid that is rated for this transmission. The cheapest I found it was for a case of 12 qts. on eBay for $157 with free shipping. You'll need 10 for the whole thing here. The extra two I'm going to use in 50,000 miles when I drain the pan and refill with two more quarts.
Here we go...
The CVT uses two filters. There is one in the transmission pan itself and one on the side on the cooler return line. Both are available through O'Reilly auto. I'm guessing you can cross-reference the filter numbers to other places if necessary as the Jatco JF011E is used in several other makes of cars. The rubber gasket included with the pan screen sucks to try to get on. Be prepared to use a heat gun to flatten it or order the standard paper/metal unit from an OEM source. I did this whole thing on a full car hoist so if you're attempting it on jack stands then a flat gasket will be a big bonus. I would also order a new cooler filter unit O-ring. The new filter doesn't include it. I was able to re-use the old one but it was a pain. A new one would speed up the process.
I'm not going to give any disclaimers here. If this looks like too much, don't do it. If you're not familiar with this sort of thing, don't do it. However, I will say this in caps: AVOID ANY CONTAMINATION OF INTERNAL PARTS WHILE DOING THIS. Water, chemical cleaners and towel lint don't mix well with CVT's. Be sure you get the dirt out of any funnels used, don't use dirty cotton towels and ensure the only fluid on internal parts is CVT fluid.
1) Warm your trans up a little by driving around for 10 minutes.
2) Get the car in the air and remove the driver's side front skid panel. You will see a pan similar to this one (this is a Nissan pic):
3) Remove the drain plug and drain out the old fluid. Be sure the plug crush washer comes with it. Up to you to replace it - I didn't.
4) Once fluid has drained, remove all pan bolts. Drop the pan slowly as there will still be some fluid in it. Drain it towards the rear.
5) Remove the gasket and all old material on the CVT gasket surface without gouging it up.
6) Clean off the magnets in the bottom of the pan. Don't drop them as rare earth magnets break easily.
7) Remove the old CVT filter screen. It's right on the bottom, held in by three bolts and looks exactly like the brand-new one in the box next to you - hence no picture. Make sure the old filter O-ring comes with it.
8) Install new filter screen with new O-ring included with it. You might need to loosely set the filter with o-ring in place and install the bolts for the final pop home. This is what I had to do. Torque is 70 in/lbs if you're into that. I use 2 or 3 fingers depending on what it felt like coming off.
10) Install pan with new gasket. Alternate bolt tightening around the pan for even pressure. Final torque is 70 in/lbs.
11) Re-fill trans through dipstick hole with a CLEAN funnel. Use about 4 and a third quarts. This completes the filter screen portion
12) Remove airbox. This will involve taking out the air filter, unbolting the three visible bolts and slipping the box out of the external air intake boot. You will also need to unplug the MAF sensor on the filtered air intake line and bungee the top of the housing away.
13) This is the only picture I took. It's a view below the airbox. The red arrow shows the filter cooler housing.
 Remove the 4 bolts holding it on. Remove the filter inside and replace with a new one with new o-ring (should be included). If you have a new cover O-ring, put it on before installing the cover. Install the 4 bolts to 37 in/lbs. This completes the cooler filter install.
14) Remove the top line from the cooler filter housing. DON'T just jerk it. It's an aluminum elbow and might break. Break the hose bond free by twisting with pliers and then use a screwdriver to gently pry it off.
15) You've now removed the return line from the cooler This is the line you will use to pump out the old fluid. Install a double-ended barb fitting to the return line and run another line to a receptacle marked with fluid capacity. I used an empty gallon windshield washer fluid bottle that I marked with quarts.
15) Have somebody sit in the car and start it. It will take a moment before fluid starts pumping. Let it fill until just under the quart mark and then have them kill the engine. It will continue draining after the engine stops and should come up to the quart mark. Once finished, put a new quart in the CVT through the dipstick hole. Lather, rinse, repeat until you see clean fluid coming out. Should take 6 of your remaining quarts. Save the partial one from earlier for later adding if required.
16) Install the return line back on the filter. Have your assistant start the car and check for leaks. Have them cycle through the gears as well and hold for about 5 seconds in each one. NOTE- you might have a check engine light. This is due to the engine running with the MAF sensor unplugged. It will clear up once the MAF is plugged back in with 3-5 engine restarts.
17) Install the airbox.
18) Check your fluid level. Let the trans warm up a bit and it should go to between the Hot marks. Remember to check with the engine running. Drive it around a bit to let it warm up if necessary.
17) Crack a cold one and enjoy the dollars saved!
That's the skinny. Let me know if you have any questions.

Interesting that Suzuki doesn't call for any filters in their instruction manual. Only parts listed are fluid and the drain plug gasket. I wonder how they even crossed reference a part number.
2011 SE AWD PLATINUM SILVER W/RRM INTAKE AND CUSTOM CAT BACK
A word of caution...there are 2 different pan filters for our CVTs. Dealer can look them up based on your VIN.
http://www.kizashiclub.com/forum/viewto ... ter#p22000
Interesting, at that time, the parts manager didn't have any of the cooler return filters on his shelf (didn't even come up in our conversation) but had both of the pan intake filters and the pan gaskets.
http://www.kizashiclub.com/forum/viewto ... ter#p22000
Interesting, at that time, the parts manager didn't have any of the cooler return filters on his shelf (didn't even come up in our conversation) but had both of the pan intake filters and the pan gaskets.
Ron
2010 Kizashi GTS, CVT, iAWD (3/10 build date)
2011 SX4 Premium Hatch, CVT, iAWD (12/10 build date)
2018 Mazda CX-5 iAWD Touring
2014 Wrangler JKUW (GONE, traded )
)
1991 Samurai, 5-Speed, EFI, Soft-Top ( sold)
sold)
2010 Kizashi GTS, CVT, iAWD (3/10 build date)
2011 SX4 Premium Hatch, CVT, iAWD (12/10 build date)
2018 Mazda CX-5 iAWD Touring
2014 Wrangler JKUW (GONE, traded
1991 Samurai, 5-Speed, EFI, Soft-Top (
-
DiggerDerrik
- Posts: 171
- Joined: Sat May 14, 2016 6:52 pm
I did this today. Couple of things I saw different from the write up. My car would not run for more then a few seconds with the MAF sensor removed. So I had to plug it back in and hold it in front of the intake hose. Second the return line On my car was the lower fitting. I had done the pan filter before but never the satellite cartridge one. That's 120K miles on it. I'd say it needed it. It was a pain in the butt to get out. I didn't want to support the transaxle and remove the motor mount but if you have time and also have large hands I would suggest doing it. I am including pics of the part numbers as well as where the filter is. Thank you for the original write up. I would never had found the filter without it.
- Attachments
-
- IMG_5709.JPG (277.5 KiB) Viewed 32623 times
-
- IMG_5708.JPG (218.7 KiB) Viewed 32623 times
-
- IMG_5706.JPG (178.45 KiB) Viewed 32623 times
-
- IMG_5707.JPG (267.73 KiB) Viewed 32623 times
2016 Ford Explorer XLT Ecoboost
2010 Kizashi GTS FWD
2011 F-350 Lariat Crew Cab 4x4 6.7
2010 Kizashi GTS FWD
2011 F-350 Lariat Crew Cab 4x4 6.7